Thursday, October 17, 2019

iPhone 5/5S/6/6S/7/8/X/XS/XS Max/XR/11/11 Pro (Max) No Service?

8 Basic Ways to Fix an iPhone That Keeps Saying "No Service"

If you are not ready for a more advanced solution to fix the problem, you can try the following basic troubleshooting solutions.

Way 1. Turn on/off Airplane Mode

This is an easy way to refresh your mobile connection. To do it go to Settings > General  > Airplane Mode and turn it on. Wait a few seconds and then turn it off again. You can also access Airplane mode through the control center.
Step 1: Simply swipe up to access the control center.
Step 2: Tap on the Airplane mode icon to turn it on.
Step 3: Wait a few seconds and turn it off again.
toggle-airplane-mode-on-iphone

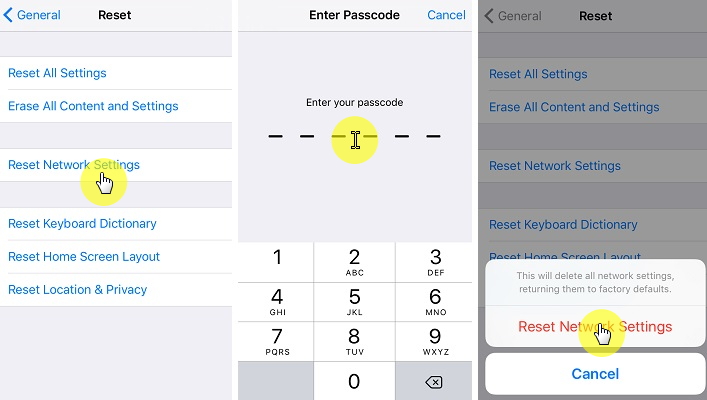
Way 2. Reset Network Settings

Since this is primarily a network issue, it may be a good idea to reset the network settings.
Step 1: Open Settings and tap on "General".
Step 2: Tap on "Reset  > Reset Network Settings" and enter your passcode when prompted.
check-reset-network- settings
Check if the problem is gone when the process is complete.

Way 3. Check Cellular Data Settings

You may also want to check if cellular data is enabled.  To do that go to Settings > Cellular > Cellular Data or Settings > Cellular > Data Roaming if you are traveling abroad.
settings-cellular-data

Way 4. Set Date and Time Settings

Sometimes the connectivity of the device can be affected by the date and time setting. You should, therefore, check if the date and time are set correctly.
Step 1: Connect the device to a Wi-Fi network.
Step 2: Go to Settings > General > Date and Time and enable "Set Automatically".
Time-and-Date-Setting

Way 5. Change "Voice & Data"

You can fix this problem by simply changing the Voice and Data in the settings on your device.
Step 1: Go to Settings > Cellular > Cellular Data Option > Voice & Data.
Step 2: If you were using a 4G switch to 3G or vice versa and then check if this works for you.
choose voice & data in lte

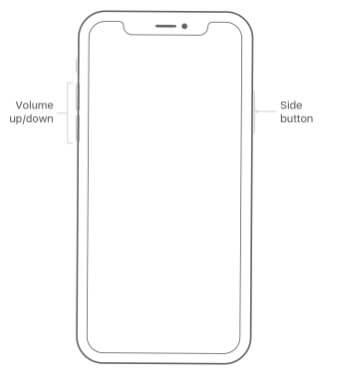
Way 6. Restart Your Device

Here is the oldest trick in the book that works to fix just about any problem including this one - simply restart the device. Here's a step by step guide to help.
Step 1: Press and hold the power and home or volume down button until you see the power off slider appear on the screen.
Step 2: Drag the slider to turn off the device completely and wait a minute before turning on the device again.
restart-iphone-device

Way 7. Take out and Insert Your SIM Card

It is also quite possible that the SIM card is not correctly inserted into the device. You can rule out this possibility by simply removing the SIM card from the device and then reinserting it back into the device. This will also refresh the SIM card and possibly solve this problem.
iphone-sim-card-slot

Way 8. Update iOS Version to the Latest

Updating your device's OS can eliminate some of the bugs in the system that can cause this issue and others. Here's how to update your device.
Step 1: Connect the device to a Wi-Fi network.
Step 2: Go to Settings  > General > Software Update.
Step 3: If an update is available, click on "Download and Install" and wait for the process to be completed.
ios12-iphone-x-settings-general-software-update-cropped

Conclusion
You could use any of the above methods above to try and fix an iPhone that says "No Service". The more practical way to eliminate this problem would be to use one of the advanced methods we have talked about earlier in this article. We'd love to hear how you're doing. Just enter your comments and questions in the comments section below and we'll do our best to help.Also Read:Keylogger Apps for iPhone

Monday, March 4, 2019

9 Ways to Fix iTunes “Back Up Now” Not Working/Greyed out after Mac OS Upgrade


Backing up your iPhone into a Mac though iTunes should be a ‘piece of cake’ under general circumstances. However, some users have encountered with an error when trying to initiate a backup through iTunes. For instance, some iOS device users have noticed that their iTunes backup not working or no backup option in iTunes. When iTunes backup greyed out, you cannot initiate the backup process. If you have ever experienced this issue afetr Mac OS update, this article will be of great use for you. Even if you have not experienced this annoying issue so far, this writing may be helpful in future.


Part 1: Fix iTunes “Back Up Now” Not Working/Greyed out after Mac OS Upgrade


Part 2: Alternative for iTunes to Make Backup Files on Mac
Part 1: Fix iTunes “Back Up Now” Not Working/Greyed out after Mac OS Upgrade

From this point onwards, let’s take a look at how to fix “iTunes backup now greyed out Mac” issue. Instead of one method, we present top easy methods to fix the said issue.


Update iTunes to the Latest Version on Mac


Restart Both of Your iOS Device and Mac


Change a Workable USB Cable


Update Apps on Your iPhone


Make Sure There’s Enough Space On Your Mac


Check Your Mac’s Security Software


Delete Corrupted Old iTunes Backups on Mac


Delete the iTunes Preferences File on Mac
1Update iTunes to the Latest Version on Mac

Generally, iTunes notifies you in the event of a release of a new version. You can simply click in the popup menu and follow the onscreen instructions to get it done. However, if the notification doesn’t appear and you still want to update iTunes on your mac to fix “iTunes backup not working” issue, you should follow these steps.


Go to App Store.


Go to the “Updates” tab. Select “Software Updates” and click on “More”.


Locate the button called “Update” next to iTunes.


The new version will be updated automatically.


Launch iTunes to try the newest version.


2Restart Both of Your iOS Device and Mac

If the problem doesn’t work even after an update, you should try restarting both the iOS device and Mac to fix “iTunes backup greyed out” issue. Here’s how to do it.
To restart your iPhone X


Hold the Side button with a volume button to get the slider appeared.


Drag it to turn off the phone.


Press and hold the Side button to start the device again.


To restart iPhone 8 or older devices (including iPads)


Hold the top or side button to get the slider appeared.


Drag it to turn off the device.


Press and hold the side or top button to start the device.


To restart Mac


Hit Apple key and click on Restart option to restart your Mac.


3Change a Workable USB Cable

Sometimes the “iTunes backup now greyed out mac” can occur due to a bad USB cable. In this case, you should replace the USB cable with a new one and give it a try. If the problem persists, you should connect the USB cable into different ports.


4Update Apps on Your iPhone

Sometimes, outdated apps can be the reason behind “no backup option in iTunes” issue. In this case, you have to fix it by updating the apps.


Go to iPhone’s App Store icon.


Tap the Updates icon.


Select “Update All”.


Enter password when prompted.


5Make Sure There’s Enough Space On Your Mac

iTunes backup will not work if you Mac doesn’t have enough space. To check the space, you should:


Go to Apple Menu and select “About This Mac” option.


Select “More Info”.


Click “Storage” to see the available space.


6Check Your Mac’s Security Software

If the security software blocks iTunes, it will not permit to backup. To check it, you should:


Go to System Preferences.


Security (or Security & Privacy) icon.


Go to the Firewall tab and check if iTunes is blocked.


7Delete Corrupted Old iTunes Backups on Mac

A corrupted iTunes backup can cause problems and prevent you from backing up iTunes. Here’s how to delete it and fix it.


Go to iTunes and select “Devices” under “Preferences”.


Under Device Backups, you will find the old backup.


Click on it and delete it.


8Delete the iTunes Preferences File on Mac

If you have changed the iTunes preferences on the Mac, you will experience some issues in creating backups. You can fix this issue simply by deleting the iTunes preference file. To do this, you should:


Go to Finder.


Press Alt/Option and click on Go.


Go to “Preferences” under “Library”.


Locate com.apple.iTunes.plist file and delete it.


Restart to finish the process.


Part 2: Alternative for iTunes to Make Backup Files on Mac

The methods we mentioned above are basic ones. If none of those methods really work for you, and you have no other way to back up your iTunes, you will have to go for an advanced option using a sophisticated software called iMyFone iTransor which is a professional backup & restore tool (renamed from iMyFone D-Port Pro).

Also Read:jihosoft Free iPhone Data Recovery

Sponsor ads:

Gihosoft Free iPhone Data Recovery:https://www.gihosoft.com/iphone-data-recovery-free.html

Gihosoft iPhone Data Recovery Free

Free iPhone Data Recovery Software for Windows/Mac

Recover up to 12+ types of files, including contacts, SMS, photos, WhatsApp, Viber, notes, etc.

Restore lost data from iOS devices directly or from iTunes and iCloud backup

Recover iPhone data lost due to iOS upgrade/jailbreak, accidental deletion, device lost or broken

Support all the latest iPhone, iPad and iPod Touch

Both Free and Pro version.

If you lost data after you updated to a new iPhone, you can always use Gihosoft iPhone Data Recovery to get the data back from the old iPhone or backup.You may also like: iphonerecovery.com

If you use android phones, please choose Gihosoft Android Data Recovery.

With Gihosoft Android Data Recovery, no longer afraid of data loss!

Must read:Youtube video downloader for pc

Gihosoft RePicvid Free Photo Recovery Software provides a free photo recovery software for windows to help users recover the deleted or lost photo for free.

Jihosoft Android Data Recovery: the best Android Data Recovery software for Windows and Mac to recover deleted contacts, messages, photos, videos, WhatsApp and etc from Android devices.Tips:How to transfer messages from iPhone to iPhone

Wednesday, February 20, 2019

How to Reset iPhone without iCloud Password 2019

1. Try an iCloud Remove Service

If the solution above fails to produce the desired result, you have the option to use an iCloud removal service. Two of the best and how to use them are outline below.

iPhoneIMEI.net

It is one of the best solutions in the market. Here’s how to use it.
Step 1: Go to iPhoneIMEI.net on any browser and enter the device’s IMEI number. If you don’t have the IMEI number, you can get it by dialing *#60# on your device or clicking on the “I” button if the device is yet to be activated.
Step 2: Click on “Unlock Now” and then make payment (about $50) and enter your email address. You will then only need to wait 1-3 days for the device to be unlocked.
Use iPhoneIMEI.net to bypass iCloud lock

OfficialiPhoneUnlck.co.uk

OffiialiPhoneUnlock.co.uk is another great alterative and much like the first solution, it is fairly easy to use. Here’s how.
Step 1: Head on over to https://www.officialiphoneunlock.co.uk/ and click on “iCloud Unlock” to enter the IMEI number.
Step 2: Make payment and wait for the device to be unlocked.
Use OfficialiPhoneUnlck.co.uk to bypass iCloud lock


2. Use the DNS Method

You can also choose to use the DNS method and although it may work, we must warn you that it may also fail sometimes. Here’s how to do it if you don’t want a paid service.
Step 1: Hold down the Sleep and Home button or the Volume Down and Power button (for iPhone 7) to reboot the device and get to the set-up screen.Sponsor ads:Fix ios device
Sponsor ads:Android Email Apps

Sponsor ads:The Best Alternative Sites For RARBG 2019 – Still Working Proxy and Mirror Sites

Step 2: Follow the on-screen instructions until you get to “Choose a Wi-Fi Network.” Click on the “I” near the Wi-Fi symbol and choose “DNS.” Type in the following numbers.
  • USA/North America: 104.154.51.7
  • Europe: 104.155.28.90
  • Asia: 104.155.220.58
  • In the rest of the world: 78.109.17.60
Step 3: Tap on the back button to get back to the previous page and then tap “Join.”
Step 4: Finally, tap the back button again to prevent the iPhone from activating and also to return to the previous page.
You should see iCloudDNSBypass.net on the screen. Simply tap on the menu to access the apps and find one that may contain the iCloud login information you need.Sponsor ads:
Gihosoft iPhone Data Recovery Free
Free iPhone Data Recovery Software for Windows/Mac
Recover up to 12+ types of files, including contacts, SMS, photos, WhatsApp, Viber, notes, etc.
Restore lost data from iOS devices directly or from iTunes and iCloud backup
Recover iPhone data lost due to iOS upgrade/jailbreak, accidental deletion, device lost or broken
Support all the latest iPhone, iPad and iPod Touch
Both Free and Pro version.
If you lost data after you updated to a new iPhone, you can always use Gihosoft iPhone Data Recovery to get the data back from the old iPhone or backup.You may also like: iphonerecovery.com
If you use android phones, please choose Gihosoft Android Data Recovery.
With Gihosoft Android Data Recovery, no longer afraid of data loss!
Gihosoft RePicvid Free Photo Recovery Software provides a free photo recovery software for windows to help users recover the deleted or lost photo for free.
Jihosoft Android Data Recovery: the best Android Data Recovery software for Windows and Mac to recover deleted contacts, messages, photos, videos, WhatsApp and etc from Android devices.Tips:How to transfer messages from iPhone to iPhone


Tuesday, February 19, 2019

iCloud not Backing Up? How to Fix? 2019 Guide


As essential as it is, backing up your device is a process that can sometimes fail to work. An iCloud backup can particularly be problematic since most of the time you set it up to work automatically. If your iCloud backup didn’t work, this article will attempt to get to the root of the problem and hopefully fix it for you.
The Prerequisites for an Automatic iCloud Backup

For an iCloud backup to work, the following conditions need to be met.


First of all, your device needs to be connected to a Wi-Fi network


There also has to be adequate storage space in iCloud to allow for the backup


Your iPhone also needs to be plugged in to a power source


And the screen needs to be off, meaning the device needs to be asleep.
How to Fix an “iCloud Not Backing up” Error

If all of the above conditions have been met and you still don’t have an iCloud backup to show for it, you may have a problem. The following are some of the quickest and most effective solutions you can try. Try one after the other until the problem has been fixed.
1 Sign out and Sign back in your iCloud Account

It is entirely possible that there is a bug in the system and a simple sign out and sign in could do the trick. Try signing out of iCloud and then signing in again. If this doesn’t do it, check out our second solution.

Step 1: Click on Settings > iCloud.

Step 2: Slide down the screen until you see the "sign out" buttion.

Note: If you sign out of your account, all iCloud Drive document and dara stored in iCloud will be removed from your iPhone.


2 Reset Network Settings

Resetting the network settings might work to fix any problem you may be having with connectivity and hence fixing the backup problem. This is especially true if your device is having trouble connecting to a Wi-Fi network. Follow these simple steps to do it.

Step 1: Tap on Settings > General.

Step 2: Scroll to find “Reset” and tap on “Reset Network Settings”.

Step 3: Enter your password for your iPhone and click on “Reset Network Settings”to confirm the action.


If this doesn’t work, try our third solution.
3 Delete Old iCloud Backups

Like we mentioned above, you could be having trouble with your iCloud backups because of a lack available iCloud storage space. To check if you have adequate storage, follow these simple steps.

Step 1: Tap on Settings and scroll down to find “iCloud.”

Step 2: Tap on the “Storage” option located at the top of the screen.

Step 3: Tap on “Manage Storage” at the center of the screen. You can view the available storage on this page.

Step 4: You can also delete some of your old backups to create space. Just make sure that they are really old and that you don’t need the data in them anymore.

If this still won't work, check if any new iOS system update is available.


4 Disable Automatic Backup of Some Apps

In igeeksblog's opinion, the size of some apps may cause the failure of iCloud backup, even if you have enough avaiable storage in iCloud. It may be helpful if you try to disable some of the Apps from backup.

Step 1: Tap on Settings App > iCloud.

Step 2: Tap on Storage > Manage Storage under iCloud settings.

Step 3: Under the the DOCUMENTS & DATA category you can find a list of apps and the size of them. If you find some apps are taking heavy storage space, you can choose to disable them.


Step 4: To turn off the automatic backup of these apps, go to iCloud > iCloud Drive. Find the apps and turn them off.


5 Backup and Restore Device using iTunes

If you try all of the above but still can’t perform an iCloud backup, try backing up your device using iTunes. Simply connect the device to your computer and launch iTunes. Click on the iPhone and then click on “Backup Now” to back up the device.


You may also like:Sponsor ads:

Gihosoft Free iPhone Data Recovery:iphonerecovery.com

Free iPhone Data Recovery Software for Windows/Mac

Recover up to 12+ types of files, including contacts, SMS, photos, WhatsApp, Viber, notes, etc.

Restore lost data from iOS devices directly or from iTunes and iCloud backup

Recover iPhone data lost due to iOS upgrade/jailbreak, accidental deletion, device lost or broken

Support all the latest iPhone, iPad and iPod Touch

Both Free and Pro version.

If you lost data after you updated to a new iPhone, you can always use Gihosoft iPhone Data Recovery to get the data back from the old iPhone or backup.

Top 10 Best FRP Bypass Tools to Bypass Google Account on Android Device 2019

Worth reading:download youtube 1080p

If you use android phones, please choose Gihosoft Android Data Recovery

Jihosoft Android Data Recovery: the best Android Data Recovery software for Windows and Mac to recover deleted contacts, messages, photos, videos, WhatsApp and etc from Android

Monday, February 18, 2019

How to Retrieve Data from Dead iPhone 2019


Did you iPhone suddenly stop working? You can’t turn it on even use it and you don’t know what to do about it. but most importantly, you are worried about the data on your device and how you can get it back. In case the iPhone is completely damaged, you are going to need to transfer the data on the device to a new one.

This article is going to show you how you can recover data from an iPhone that is unresponsive. There are several things you can try to revive the device and we are going to share those with you here as well as provide you with a fool-proof solution to recover data from a dead iPhone.
Ways to Retrieve Data from a Dead iPhone

The following are some solutions you can try to revive the iPhone.
1. Check to see if the device can be recognized by iTunes

Connect the device to the computer using USB cables and if iTunes recognizes it, you can then backup your data using iTunes immediately. You can then restore the backup to the iPhone when you fix it or to a new device.


2. Charge your iPhone for a while

Sometimes the problem can be a lack of power. So, try to connect the device to a power source using a different USB or USB power adapter to see if it works. Be patient, allow the device to charge for about 15-30 minutes before trying to use it.


3. Try force restarting the device

If the device is stuck on the black screen, try force restarting the device. Press and hold the Sleep/Wake button plus Home button for 10 seconds and wait for the device to restart.


4. Retreive data from iPhone backup file (iOS 11 Supported)

Must Read:If you lost data after you updated to a new iPhone, you can always use Gihosoft iPhone Data Recovery to get the data back from the old iPhone or backup.

Gihosoft Free iPhone Data Recovery:iphonerecovery.com

If you use android phones, please choose Gihosoft Android Data Recovery


Sponsor ads:Free Antivirus for iPhone

Sunday, February 17, 2019

How to Turn off Private Browsing on iPhone 2019


How to Turn off Private Browsing on iPhone
1What's Private Browsing on iPhone


Private browsing protects your password, login information from being saved by Safari. It acts as a sieve which restricts Safari from tracking your search behavior or registering your visited websites as a part of history. Once you do search for the same website again, safari won’t auto fill the information because it would lack the data to do so.


Pros


Using private browsing option enables you to minimize the storage of your personal data. Frequent visitation to a certain website for e.g health websites, medical webpages or workout pages instantly triggers a spam of advertisements.


Enabling private browsing would help you counter that problem. Air ticket prices online varies on the number of times you have visited the site. You would be saving a lot of money on air tickets by using private browsing.


Cons


The downside of private browsing includes the great inconvenience when retracing your steps to something you saw online. Your password or login information won’t be saved, that means you would have to login every time you visit using private browsing.


It clears away all historyclears away all history, cookies and cache so retrieving past information becomes impossibly difficult.


You would eventually ask yourself how do I turn off private browsing on my iPhone?
2 How to Turn off Private Browsing on iPhone


You can follow these easy steps if you are wondering how to turn off private browsing on your iPhone:


Open Safari on your iPhone.


Tap on the double boxed icon on the extreme right.


Click on ‘Private’ so it changes from highlighted white to plain text.


Sponsor ads:


Gihosoft Free iPhone Data Recovery:iphonerecovery.com


Free iPhone Data Recovery Software for Windows/Mac


Recover up to 12+ types of files, including contacts, SMS, photos, WhatsApp, Viber, notes, etc.


Restore lost data from iOS devices directly or from iTunes and iCloud backup


Recover iPhone data lost due to iOS upgrade/jailbreak, accidental deletion, device lost or broken


Support all the latest iPhone, iPad and iPod Touch


Both Free and Pro version.


If you lost data after you updated to a new iPhone, you can always use Gihosoft iPhone Data Recovery to get the data back from the old iPhone or backup.


Top 10 Best FRP Bypass Tools to Bypass Google Account on Android Device 2019


Worth reading:download youtube 1080p


If you use android phones, please choose Gihosoft Android Data Recovery


Jihosoft Android Data Recovery: the best Android Data Recovery software for Windows and Mac to recover deleted contacts, messages, photos, videos, WhatsApp and etc from Android

Monday, February 11, 2019

Best Professional Audio Editing Software For Mac 2019


Best Professional Audio Editing Software For Mac 2019
1. WavePad:

This software is a full-featured professional audio and music editor not only for the Mac but also for Windows. With this tool, one can record and edit the audio recordings, voice, and music. During editing, you can cut, copy and paste of the recordings with additional effects like amplification, echo, and noise reduction. Though WavePad works as an mp3 or wav editor, yet it can support many other file formats like gsm, vox, real audio, WMA, aif, au, ogg, FLAC, and few more.
Key Features of WavePad:


It provides easy to use interface that can complete the task within minutes.


Editing functions include copy, cut, delete, paste, silence, insert, auto-trim and many more


Audio effects include normalizing, amplifying, envelope, equalizer, echo, reverb, reverse and few more


Supported audio and music file formats include mp3, vox, wav, WMA, gsm, aif, au, real audio, FLAC, aac, ogg, mid, m4a, and Amr.


For professional access to thousands of effect and tools integrated VST plugin support is there.


With the batch processing option, one can apply effects, and with a single function, it can convert thousands of files.


For precise editing, there is an option of scrub, search and bookmark audio.


To find the audio file easily, create bookmarks and regions


Other tools include text-to-speech converter and voice changer


Audio restoration have an option of clicks pop removal and noise reduction


It supports rates from 6 to 96 kHz, 8, 16, 24 or 32 bits, stereo or mono
2. GarageBand:

GarageBand is excellent software for iOS platform only. With each new MAC, Apple provides an entry-level GarageBand music editing app. So if you are new to the music market or a hobbyist, you will get a GarageBand of novice level. It uses Drummer digital session player that makes it perfect to create and mix the songs especially you are completely new for this area. You can download Garageband for windows.
Key Features of GarageBand:


One can upload their created music and recordings to GarageBand and even can able to mix it with the digital instrument.


Using the recording or instrument of GarageBand, one can create an entire song easily.


If you want upgraded instruments, then you can purchase different instrument packs for multiple sounds.


Store your music on iCloud or share them with GarageBand or friends.


The best part is starting editing on your iPhone and finish it on your Mac. Yes, with GarageBand it is possible.
3. Djay pro:

Djay pro gives you the best performance and output with its compatibility, effects, and mixing capabilities. You can test it from iTunes and Spotify together. Even you can mix the music in video format from its huge library.
Key Features of Djay pro:


Pick for any of four desks to mix, and create transitions galore, mashups.


Edit your playlist within a minute


There is a pioneer CDJ/XDJ integration for versatility, and you can use even external displays and AirPlay
Conclusion:

It is all about Best professional audio editing software for mac. Hope you like it. If it is so, then share it with music geek. Thank you!Sponsor ads:

Gihosoft Free iPhone Data Recovery:iphonerecovery.com

Free iPhone Data Recovery Software for Windows/Mac

Recover up to 12+ types of files, including contacts, SMS, photos, WhatsApp, Viber, notes, etc.

Restore lost data from iOS devices directly or from iTunes and iCloud backup

Recover iPhone data lost due to iOS upgrade/jailbreak, accidental deletion, device lost or broken

Support all the latest iPhone, iPad and iPod Touch

Both Free and Pro version.

If you lost data after you updated to a new iPhone, you can always use Gihosoft iPhone Data Recovery to get the data back from the old iPhone or backup.

Top 10 Best FRP Bypass Tools to Bypass Google Account on Android Device 2019

Worth reading:download youtube 1080p

If you use android phones, please choose Gihosoft Android Data Recovery

Jihosoft Android Data Recovery: the best Android Data Recovery software for Windows and Mac to recover deleted contacts, messages, photos, videos, WhatsApp and etc from Android

iPhone 5/5S/6/6S/7/8/X/XS/XS Max/XR/11/11 Pro (Max) No Service?

8 Basic Ways to Fix an iPhone That Keeps Saying "No Service" If you are not ready for a more advanced solution to fix the probl...